How to Create a Garden Workshop Tool Storage Ideas for Small Sheds
Most garden sheds start their life as a catch-all for muddy boots, half-empty paint cans, and that rake you swear you’ll fix someday. But give it a weekend and a bit of elbow grease, and the same cramped box can turn into a proper workshop, somewhere you actually want to spend a Saturday morning. Tight space just means you get clever. These small shed storage tricks, shed organization ideas, and tips to organize garden tools are the difference between digging through chaos and grabbing exactly what you need. No pro skills required, just a tape measure, a coffee, and the urge to make sawdust.
Plan Your Shed Layout
Before you hammer a single nail, measure everything. Width, length, height to the rafters, write it all down. Sketch the floor on graph paper (or the back of an envelope). Split it into zones: potting corner, cutting corner, “stuff I rarely touch” corner. Leave a 3-foot aisle down the middle so you’re not doing the shed shuffle every time you turn around.
Put the heavy bags of compost opposite the door hinge so it swings wide. Park the workbench under the window, because sunlight beats a headlamp any day. Jot where you’ll need power, a £10 extension reel clipped to the wall keeps cords from turning into tripwires. Hang a mini whiteboard by the door for “buy more screws” reminders. Ten minutes of planning now saves ten hours of swearing later.
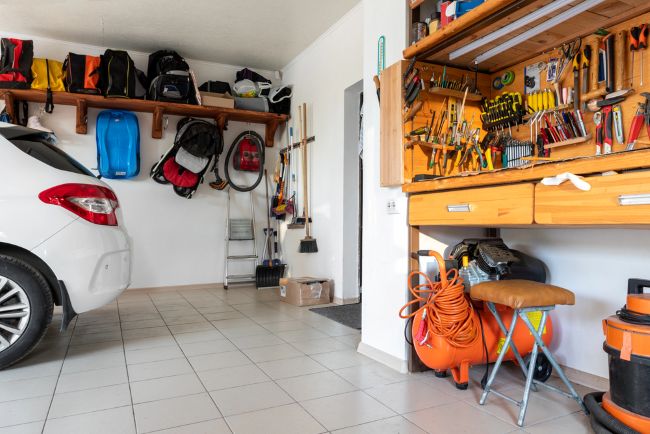
Use Wall Space for Storage
Blank walls are wasted real estate. Screw up a sheet of pegboard (£15 at the DIY store), and suddenly every hammer has a home. Trace each tool’s outline in marker so even the kids know where it goes back. Add a couple of short shelves across the pegboard for seed trays or spray bottles.
Magnetic knife strips (yes, the kitchen kind) hold screwdrivers and pliers like magic. French cleats are just angled wood strips, they let you slide whole racks off the wall when you need to rearrange. One afternoon with a drill and the walls do the heavy lifting, leaving the floor free for dancing, or at least not tripping.
Add Shelves and Cabinets
Shelves are the unsung heroes of tiny sheds. Metal standards and brackets let you move heights as your stuff changes. Eye-level for the stuff you grab daily, knee-level for heavy pots, nose-bleed high for Christmas lights. Clear plastic bins mean you can spot the right screws without opening three lids.
A lockable cabinet keeps weedkillers away from curious dogs. Rolling ones tuck under benches and wheel out when you need them. Build a quick plywood box if you’re feeling handy – two sides, a top, a bottom, cheap hinges, done. Anchor anything tall to the wall, nobody wants a shelf avalanche at 7 a.m.
- Shelf shortcuts:
- Wire baskets clipped underneath catch gloves and tape that always escape.
- A lazy-Susan in the corner spins bottles so nothing hides at the back.
- An old bookcase, painted cheery green, suddenly looks custom.
- Slide-out trays between shelves keep sandpaper flat and dust-free.
Hang Long Tools Efficiently
Rakes and shovels love to domino the second you open the door. Stop the nonsense with a board and some PVC pipe cut in half – screw the halves to the board, slide handles in, heads stay proud. Or grab a £12 plastic rack with slots.
The back of the door is prime real estate, over-door hooks or a canvas pocket organizer hide your brooms without eating floor space. Ceiling joists can take J-hooks for ladders, wrap the hooks in old hose to save scratches. Group by season, rakes left, snow shovels right, and swapping in April takes thirty seconds.
Use Overhead and Corner Storage
Look up: rafters beg for bikes on pulleys or leaf blowers in slings. A £20 pulley kit lowers heavy stuff with one tug. Build a mini loft from scrap 2x4s and plywood for boxes you touch twice a year – holiday inflatables, spare hose reels.
Corners are sneaky goldmines. A triangular shelf or spinning carousel keeps fertilizer jugs from hogging the walkway. Dust once a month or you’ll shower in cobwebs every time you pull the Christmas box. Height plus corners equals double the shed without moving a wall.
Set Up a Small Workbench
You need a flat spot to actually do things. A 4×2-foot plywood top on 2×4 legs bolts to the wall with beefy hinges – flip it down when you work, flip it up when the car needs parking. Add lockable metal legs for wobble-free sawing. Or wheel in a tool cart, the top becomes a bench, the drawers will hide any small elements.
Hang a pegboard backdrop for pliers and tape. Clip a rechargeable LED floodlight overhead, you will get bright light, without shadows, and no cords. A rubber mat on top saves your back and keeps chisels from rolling. Suddenly you’ve got a spot for gluing birdhouses or repotting tomatoes without dragging everything onto the patio.
Keep Tools Organized and Labeled
The “I’ll remember where I put it” method lasts exactly one busy weekend. Group similar items together: diggers in one bin, cutters in another. Clear coffee jars screwed under a shelf can hold nails by size – twist, grab, done.
Label everything. A £10 label maker feels fancy, masking tape and Sharpie works too. Colour-code bins – green for garden, blue for woodwork. Keep a laminated cheat-sheet on the door: “Pruners in top left hook”. Five minutes of putting away beats twenty minutes of hunting every single time.
Protect Tools from Weather
Damp is a silent killer. Rust creeps overnight, handles go moldy. Crack a vent or add a £15 solar fan to move air. Silica packs in toolboxes suck moisture like sponges. Raise everything an inch off the floor on pallets or rubber mats, because ground water loves to sneak in.
Wipe power tools with a dry rag, spritz metal with light oil. Make sure your power tool storage area is somewhere high, and that the tools are covered with a waterproof tarp. Wooden handles should get a rub of linseed oil twice a year. Canvas bags breathe, while plastic ones sweat. Drain hoses flat in winter or they’ll split come spring. A dry shed means your drill still spins next season instead of seizing up.
Try DIY Storage Hacks
Store-bought is fine, but homemade fits your shed. Saw a pallet apart and screw the slats to a frame, and you will get an instant rake rack. Gutter offcuts bolted horizontally coil hoses without kinks. Tension rods across open shelves stop spray cans rolling like bowling pins.
Shower caddies suction to the door for gloves, while milk crates on casters become a rolling seed tower. Old belts looped on hooks hold extension cords neat. Most hacks cost less than a takeaway and use junk you were going to skip anyway.
Maintain a Clean and Tidy Workshop
A clean shed is a happy shed. Five minutes at the end of each session to sweep, wipe, return three things, it keeps chaos from snowballing. Weekly vacuum the corners, monthly purge the “maybe” pile. Keep a bin and a recycle box right inside the door so rubbish never lives on the bench.
Hang the broom where you’ll see it. Play a three-song playlist while you tidy, the time will fly. A quick routine means you walk in ready to work, not ready to wrestle.
Conclusion
A shed doesn’t need to be big to be brilliant. Hang a pegboard, label a bin, flip down a bench, and suddenly it’s a real garden shed workshop. Start with whatever bugs you most (maybe the rake avalanche), and fix one corner. The rest follows. Soon every tool will have a home, projects will get finished faster, and stepping inside will feel like walking into your own little hardware store. Measure once, smile a lot, and enjoy the sawdust.


