
Growing melons in a glasshouse
Few crops reward the greenhouse grower with more drama — or more flavour — than a well-grown melon. Yet melons have a reputation for being demanding, and much of that reputation traces back to one critical stage: establishing young plants correctly so their roots have the depth, nutrition, and moisture-retention they need to sustain vigorous summer growth. Get this foundation right, and melons are far more straightforward than many gardeners expect.
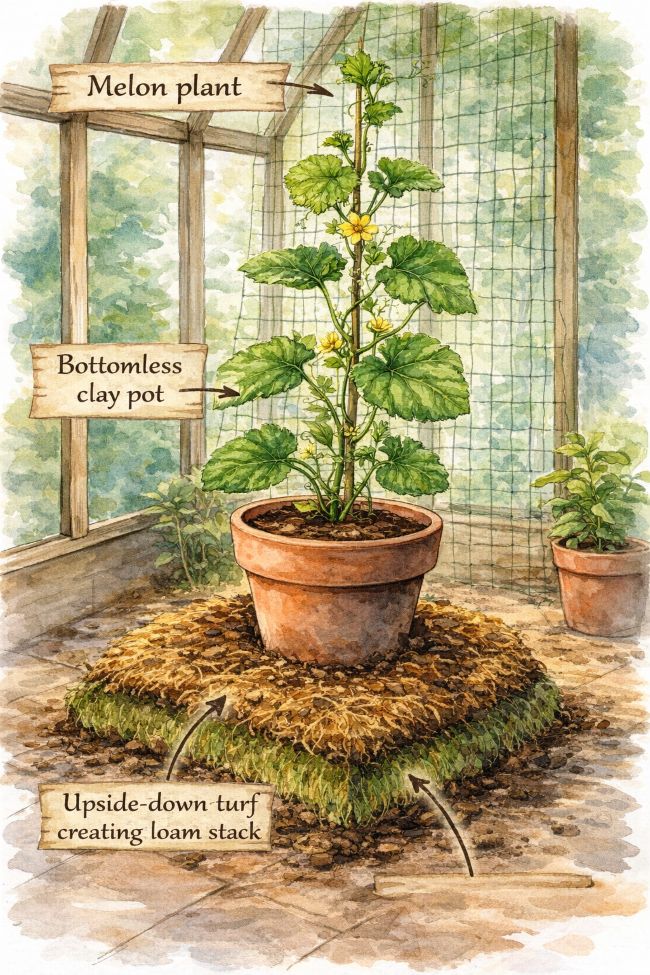
At GardenAdvice, our preferred method for starting greenhouse melons is the loam stack technique — a traditional approach using bottomless clay pots set onto hand-cut turf stacks. It is simple to set up, uses entirely natural materials, and gives young melon plants exactly the rooting environment they need to thrive.
Starting Your Plants: Seed or Young Plant?
Melons can be started in one of two ways. The simplest option is to buy young plants from a reputable nursery or garden centre in late spring, once they become available. This removes the guesswork from germination and is a reliable choice for most greenhouse growers.
If you prefer to sow your own, use a good quality John Innes seed compost in a small pot or module tray. Sow seeds on their edge — this reduces the risk of rotting — at a depth of around 1cm. Keep them in a propagator or warm location at 18–24°C. Germination is usually rapid, typically within five to ten days under good conditions.
GardenAdvice Tip: Whether sowing from seed or potting on bought plants, always use a John Innes-based compost rather than a peat-free multipurpose. The loam content provides better drainage, structure, and nutrient-holding capacity — all of which matter greatly for melons.
Potting On: When and How
Once your young melon plant is around 100mm (10cm) tall and handling confidently — with a well-formed root system visible at the base of its starter pot — it is ready to move into its main growing vessel. At this stage growth is rapid, and delays in potting on can quickly lead to a root-bound plant.
Preparing the Clay Pot
You will need an 8-inch (approximately 200mm) terracotta clay pot. Before use, the bottom of the pot must be removed. This is straightforward: hold the pot steady on a firm surface and use a small hammer to tap firmly the base. The terracotta will crack cleanly, and the base pieces can be lifted away, leaving an open-ended cylinder.
Next pot the melon into the baseless pot using some cardboard over the base of the pot to stop the compost falling out until it stood on the loam stack.
GardenAdvice Tip: Tap around the base of the pot rather than striking it in one spot. This gives a cleaner break and reduces the risk of cracking the side walls, which need to remain intact.
Building the Loam Stack
The loam stack is the heart of this technique. It acts as a deep, moisture-retentive, nutrient-rich rooting medium into which the melon’s roots will travel once they extend beyond the bottomless pot. Think of it as a natural planting bed, precisely sized for greenhouse conditions.
Cutting the Turves
You will need good quality, fine-textured turf — similar to what you would use when turfing a lawn, but cut into smaller, more manageable sods. Cut each turf to approximately 25mm depth. This gives you a sod with a layer of roots, soil, and a thin covering of grass.
Assembling the Stack
Each loam stack serves one melon plant. Allow an area of approximately 500–800mm square per plant, depending on the space available on your greenhouse bench or floor. Assemble three layers of turves, each placed grass-side down.
Inverting the turves is important for two reasons: it prevents the grass growing upward (the roots will die off in the dark beneath the pot), and it ensures the richer soil content faces upward, where the melon roots will find it. Stack the three layers directly on the greenhouse bench or floor, building to a total height of roughly 75–80mm. The stack does not need to be perfectly neat — a solid, stable block of inverted turf is all that is required.
Watering the Stack
Before placing the pot, water the loam stack thoroughly. You want the turves to be evenly moist throughout — not waterlogged, but well-saturated. A dry stack will not draw roots downward; this initial moisture encourages the melon roots to seek out the loam as they develop.
GardenAdvice Tip: The grass on the outer edges of the inverted turves may produce a little growth at the margins of the stack. This is nothing to worry about and can simply be trimmed back if it becomes untidy. The central area, covered by the pot, will remain clear.
Placing the Pot on the Stack
With the loam stack in place and well-watered, set the bottomless clay pot — with the melon plant inside and the loose base piece underneath — directly onto the top of the stack. The pot should sit level and stable.
As the plant establishes and begins to grow, it will send roots downward through the open base and into the rich loam beneath. This is the key advantage of the technique: the plant is never rootbound, has access to a large and naturally moisture-retentive medium, and grows with a vigour that is difficult to achieve in a conventional container.
Training the Plant as it Grows
Once the melon is established on the loam stack and growing away strongly, the next priority is providing support for the developing vine. Melons climb by means of tendrils — fine, spiralling growths that reach out and grip whatever structure is nearest.
Fix a net or a series of horizontal wires to the inside of the greenhouse frame above each plant, running up toward the roof. As the main stem extends, guide it toward the support and allow the tendrils to take hold naturally. In a well-heated greenhouse from May onward, growth can be surprisingly rapid, and plants may need checking every few days.
Pinch out the growing tip of the main stem once it reaches the top of its support, and train lateral shoots along horizontal wires to create a fruiting framework. Female flowers — which carry the small embryonic fruit behind the bloom — will develop on these laterals. This is where your melons will form.
Step-by-Step Summary
- Start young plants in John Innes compost, either from seed or as bought young plants.
- When plants reach approximately 100mm tall, pot on into an 8-inch clay pot with its base removed.
- Build a loam stack of three layers of inverted turf (25mm per sod) in a 500–800mm square area on the greenhouse bench or floor.
- Water the stack thoroughly before use.
- Set the bottomless clay pot onto the loam stack, with the loose base piece underneath to hold compost in place initially.
- Provide netting or wires for the growing plant to climb, and train the vine up the side of the greenhouse as it develops.
The loam stack method is one of those traditional horticultural techniques that rewards attention to detail at the outset. Time spent building the stack correctly and siting the pots well is repaid many times over as the season progresses — and plants establish with the kind of vigour that produces the large, sweet-fleshed fruits that make greenhouse melon-growing one of summer’s great pleasures.