
How to Build a Durable Patio Base with Timber Screed Rails
Download Printable Version Click Here
How to Build a Durable Patio Base with Timber Screed Rails
A well-built patio starts with a solid foundation. Many patio problems such as sinking slabs, rocking paving, and poor drainage can usually be traced back to an inadequate base. If you’re planning to install a new patio, one simple method we often recommend is to construct the patio base first, allow it to cure properly, and then lay the paving as one of the final jobs during the project.
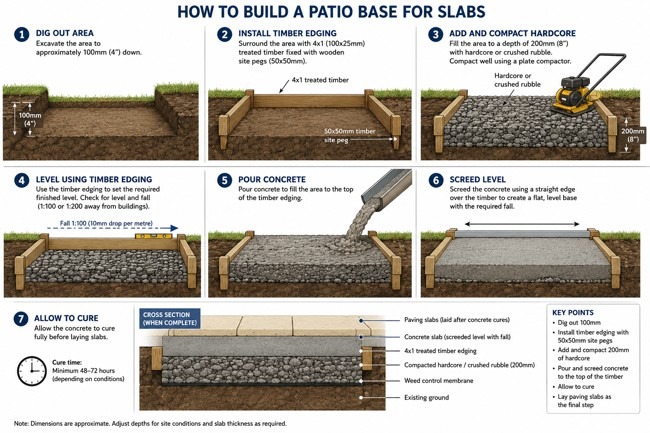
Step 1 – Mark Out and Excavate
Begin by marking out the size of the patio using string lines and pegs. Remove the turf and excavate the area to a suitable depth to allow for:
- Weed control membrane
- Hardcore sub-base
- Concrete slab
- Final paving
The exact depth will vary depending on the site and paving being used, but typically between 250mm and 350mm is required.
Step 2 – Install a Weed Control Membrane
Before adding any hardcore, lay a good-quality weed control membrane over the excavated area. This helps reduce the risk of weeds growing up through the patio in future years and also helps separate the sub-base from the surrounding soil.
Step 3 – Create the Hardcore Foundation
Add a substantial layer of hardcore to the area. Suitable materials include:
- MOT Type 1 purchased from a builders’ merchant
- Clean recycled bricks and rubble
- Crushed concrete
The material should be compacted thoroughly using a vibrating plate compactor. Compacting in several thinner layers often produces a better result than attempting to compact one deep layer.
Step 4 – Install Timber Screed Rails
Around the perimeter of the patio, fix treated 4×1 timber boards using timber pegs. These boards act as permanent screed rails and create a box that defines the final level of the patio base. At this stage, build in a slight fall to allow rainwater to drain away from the property.
A fall of:
- 1 in 100 for most patios
- 1 in 200 where only a very gentle slope is required
is normally sufficient. The timber rails now become your guide for creating a perfectly level and consistent concrete slab.
Step 5 – Pour and Screed the Concrete
Fill the area with concrete. Using a straight edge resting on the timber screed rails, level the concrete across the entire surface. This creates a solid, flat base similar to a house floor slab. Because the levels have already been established using the timber edging, the screeding process becomes straightforward and accurate.
Step 6 – Allow the Concrete to Cure
Leave the concrete to harden properly before any paving is laid. This is often a good stage to complete other building work around the garden, carry out rubbish removal, or finish landscaping tasks. A proper cure will ensure longevity and strength in your patio base.
Step 7 – Lay the Paving
Once the concrete has cured, the paving can be laid as one of the final jobs. Because the base is already perfectly level and includes the correct fall, laying the paving becomes much easier and produces a professional-looking result.
Why This Method Works
The main advantage of this system is that all the difficult levelling work is completed before the paving is installed. Benefits include:
- Strong, long-lasting base
- Reduced risk of settlement
- Easier paving installation
- Accurate drainage falls
- Cleaner and more professional finish
A patio is only ever as good as the foundation beneath it, so investing time in creating a properly compacted sub-base and concrete slab will usually pay dividends for many years to come.