Essential Guide to Pruning Ceanothus After Flowering: Best Practices and Tips
Understanding Ceanothus Pruning
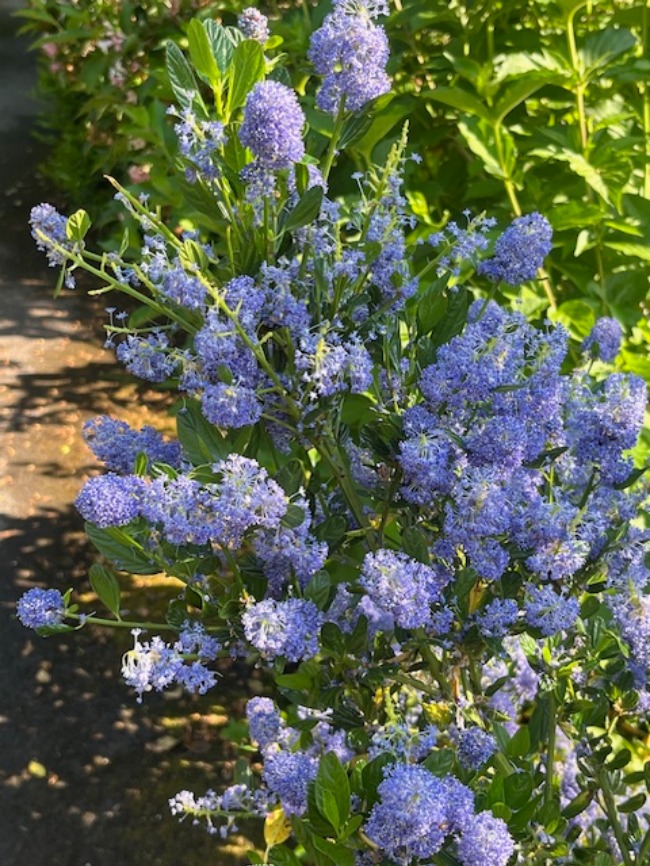
Ceanothus, commonly known as California lilac, is a vibrant and hardy shrub native to the western United States. Renowned for its stunning blue and purple flowers, ceanothus blooms in late spring to early summer, creating a delightful spectacle in gardens. As the flowering period comes to an end, proper pruning becomes essential for maintaining the health and appearance of your ceanothus plants. This post provides key insights on how to effectively prune ceanothus at the end of its floral display.
Why Prune Ceanothus?
Pruning serves several important purposes:
- Encourage Healthy Growth: Regular pruning helps stimulate new growth, allowing plants to thrive and bloom again in the following season.
- Manage Size and Shape: Pruning allows you to control the size and shape of the shrub, ensuring it fits well in your landscape design.
- Remove Dead or Diseased Wood: Cutting away dead or unhealthy branches prevents the spread of disease and promotes overall plant vitality.
- Improve Airflow: Proper pruning ensures better airflow within the plant, reducing the risk of pests and diseases.
When to Prune Ceanothus
The best time to prune ceanothus is immediately after the flowering period, which typically occurs in late spring to early summer. Timing your pruning is crucial because ceanothus blooms on new wood produced during the current growing season. Pruning too early in the spring may remove potential flower buds, leading to reduced blooms.
Tools You Will Need
Before you start pruning, gather the following tools:
- Pruning Shears: For cutting smaller stems and branches.
- Loppers: Ideal for thicker branches that are too big for shears.
- Bypass Pruners: Best for making clean cuts close to the stem.
- Gloves: To protect your hands while working.
- Disinfectant: To clean tools before and after use to prevent the spread of disease.
Steps to Prune Ceanothus
Follow these steps for effective pruning:
1. Assess the Plant
Before making any cuts, take some time to observe the plant. Look for signs of dead, damaged, or diseased branches. Identify areas where the shrub might be overcrowded or unevenly shaped.
2. Start with Dead or Damaged Wood
Begin by removing any dead or damaged branches. Cut them back to healthy wood, making your cuts at a slight angle above a bud or healthy leaf node to promote regrowth.
3. Thin Out Overgrown Areas
To improve airflow, selectively remove some of the older stems. Aim to maintain an open center within the shrub, which allows sunlight to penetrate and encourages growth.
4. Shape the Plant
After thinning, step back and assess the overall shape of the shrub. Trim back branches that extend outside of the desired shape, keeping in mind that ceanothus can be shaped to be rounded or more upright, depending on your preference.
5. Limit Cut Back
Avoid excessive pruning. Ceanothus does not require heavy pruning; removing up to one-third of the plant is usually sufficient. Aim for a natural form that still showcases its beautiful character.
6. Clean Up Cuttings
After you complete the pruning, clean up all cuttings and debris from the base of the plant. This will help prevent pests and diseases from taking hold.
Post-Pruning Care
Following pruning, give your ceanothus a deep watering (if there hasn’t been sufficient rainfall) and consider applying a balanced, slow-release fertilizer to support new growth. Remember that ceanothus is drought-tolerant once established, so avoid overwatering.
Pruning ceanothus at the end of its flowering season is crucial for maintaining its health and enhancing its beauty in your garden. By following these steps, you can ensure that your ceanothus remains a vibrant centerpiece in your landscape, ready to bloom beautifully again next season. With proper care, your ceanothus will thrive for many years to come!