A Pro Guide to Relaying Your Slate Patio: Restoring Your Garden’s Character
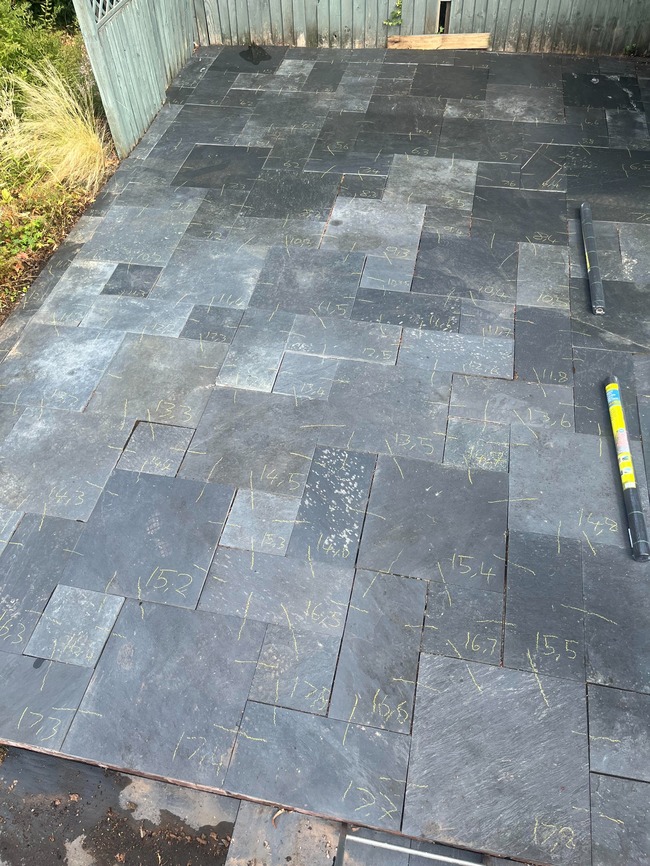
Before lifting a slate patio and relaying its a good idea to mark the patten to make relaying easier
Revitalizing Your Outdoor Space: The Art of Relaying a Slate Patio
A slate patio is a beautiful addition to any home, offering a timeless, rustic charm that is hard to replicate. However, over time, shifting ground, tree roots, or simple wear and tear can leave your patio looking uneven or neglected. The good news is that you don’t always need to replace the entire feature. Relaying your existing slate is an excellent way to restore the patio’s functionality while keeping the character of the original stone intact. This guide will walk you through the essential steps to ensure your project is a success.
Phase 1: Preparation and Preservation
Before you lift a single stone, the most crucial step is planning. If your slate is currently laid in a specific aesthetic pattern—such as a flagstone mosaic or a herringbone design—you must preserve that sequence. Use a builder’s pen to mark each slate slab as you remove it. Create a corresponding map or take detailed photographs of the layout. This simple organizational step will save you hours of frustration when it comes time to piece the puzzle back together.
Carefully pry up each slate using a spade or a pry bar, being mindful of the edges to avoid cracking the natural stone. Clear away the old mortar or sand bedding and stack the slates neatly in a safe location, keeping them organized according to your marks.
Phase 2: Assessing and Repairing the Base
The longevity of your patio is entirely dependent on what lies beneath. Once the slate is removed, you may find that the underlying base has failed. In many cases, you will need to re-compact or even re-lay the base entirely. If you notice sinking sections, it is a sign that the sub-base materials have migrated or eroded.
- Clear the area: Remove all loose debris and old bedding material to expose the sub-grade.
- Check for level: Use a spirit level and string line to ensure your base has the correct fall (slope) to allow for water runoff away from your house.
- Re-compact: Add a fresh layer of MOT Type 1 aggregate or similar sub-base material. Use a mechanical plate compactor to ensure the base is rock solid.
- Repair the base: If the ground remains soft, you may need to dig deeper, add a layer of landscape fabric, and increase the depth of your compacted stone layer.
Phase 3: Relaying the Slate
With a firm foundation established, you are ready to begin the relaying process. Start by spreading a layer of clean, sharp sand or a wet-mix mortar bed (depending on your specific requirements) over the base. Using your builder’s pen markings as your guide, begin setting the slates back into position. Start from the most visible edge or a corner and work outward.
As you lay each piece, use a rubber mallet to gently tap the slate into the bed, ensuring it is level with its neighbors. Check your levels frequently; a small error early on can lead to a significant trip hazard by the time you reach the other side of the patio.
Final Touches: Pointing and Finishing
Once all the slate is back in place, you will need to finish the joints. If you are going for a traditional look, a mortar joint is standard, though resin-based patio grouts have become popular for their durability and ease of installation. Ensure the joints are filled completely, then sweep away any excess material to prevent staining the natural surface of the slate.
By following these steps, you are not just repairing a patio; you are preserving the craftsmanship of the original build. With a solid base and careful attention to detail, your relaid slate patio will provide many more years of beauty and outdoor enjoyment.