Pricking Out Seedlings
Downloadable pdf guilde on pricking out seedlings
Pricking Out Seedlings – How to Transplant Young Seedlings Successfully
Pricking out is the process of carefully moving young seedlings from a seed tray or crowded sowing container into individual pots, modules or a larger growing space.
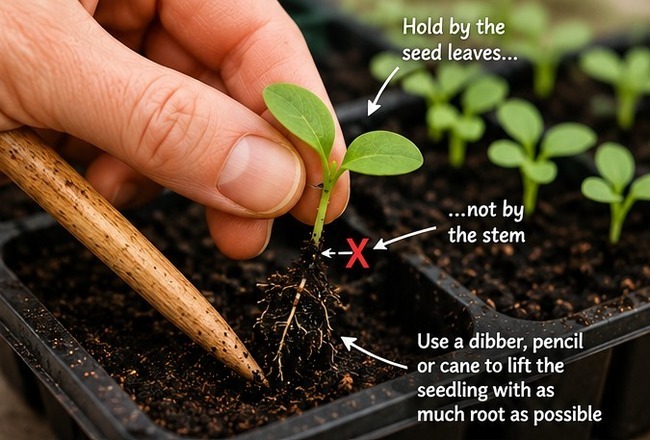
It is a simple job, but young seedlings are delicate. The key to successful pricking out is to handle seedlings by their seed leaves rather than their stems, retain as much root as possible, and disturb them as little as possible during and after transplanting.
Handled correctly, seedlings should establish quickly and continue growing with very little interruption.
When Are Seedlings Ready to Prick Out?
Before pricking out, seedlings need to be large enough to handle safely by their seed leaves, also known as cotyledons.
These are the first leaves that appear after germination.
Avoid trying to prick out seedlings when they are so small that the only practical way to pick them up is by their stems. It is usually better to wait until they are large enough to handle comfortably and individually.
Always Handle Seedlings by the Leaves – Never the Stem
This is one of the most important rules when pricking out seedlings.
Always pick up and handle a seedling gently by one of its seed leaves, never by its stem.
The reason is simple.
A young seedling’s stem is extremely delicate. If you squeeze, bruise or crush it, the damage can be permanent and the seedling may not recover.
The seed leaves are much less critical. If you accidentally bruise or slightly damage a seed leaf while handling the plant, the seedling will normally recover and continue producing new leaves.
So remember:
Leaves can recover – a badly damaged stem often cannot.
Water the Seed Tray Before You Start
A few hours before you plan to prick out your seedlings, water the compost thoroughly and then allow it to drain.
You are aiming for compost that is evenly moist but not soaking wet.
Moist compost holds together around the roots and makes it much easier to lift seedlings without tearing away their developing root systems.
Allowing a few hours between watering and pricking out also gives excess water time to drain away.
Keep as Much Root as Possible
The second major principle of successful pricking out is:
Move the seedling with as much of its root system intact as possible.
Never simply grab a seedling and pull it out of the compost.
Instead, use a dibber, pencil, plant label or small piece of cane to loosen the compost underneath and around the seedling.
Gently hold the seedling by a seed leaf while working the dibber underneath its roots.
Lift from below rather than pulling from above.
The aim is to bring the seedling out with as much root as possible and with minimum disturbance.
The more healthy root you retain, the easier it will be for the seedling to establish in its new compost.
How to Prick Out Seedlings – Step by Step
1. Prepare the new pots or modules
Fill your pots, trays or modules with suitable compost and lightly firm it.
Have everything ready before lifting the first seedling so that its roots are not left exposed unnecessarily.
2. Make a planting hole
Use your dibber, pencil or cane to make a hole in the compost.
Make the hole large and deep enough to accommodate the seedling’s roots without forcing or folding them unnecessarily.
3. Lift the seedling
Gently hold the seedling by one of its seed leaves.
Insert your dibber underneath and alongside the seedling and carefully loosen the surrounding compost.
Ease the seedling upwards, bringing as much root with it as possible.
Do not pull the seedling out by its leaves or stem – use the dibber to do the lifting.
4. Place the seedling into its new position
Lower the roots carefully into the prepared hole.
As a general rule, plant the seedling at approximately the same depth it was growing at previously.
Avoid leaving it too shallow, with roots exposed near the surface, or burying it unnecessarily deeply.
5. Lightly firm the compost
Use the dibber to gently move and firm the compost around the roots.
You only need enough pressure to ensure that the roots have good contact with the surrounding compost.
Avoid pressing the compost down heavily.
6. Water thoroughly
Once the seedlings have been transplanted, water them carefully but thoroughly.
This helps settle the compost around the roots and removes large air pockets.
Don’t Worry if Seedlings Fall Over After Watering
Immediately after watering, newly pricked-out seedlings can sometimes look rather alarming.
They may lean over, flop sideways or appear as though the whole operation has gone wrong.
This is often perfectly normal.
Watering can temporarily knock delicate seedlings sideways, particularly when they have only just been transplanted.
Leave them alone for a few hours.
In many cases, they will gradually lift themselves upright and begin growing normally again.
The temptation is often to keep touching, straightening and checking them. This can cause more disturbance just when the seedlings need time to settle.
Avoid “Checking” Newly Transplanted Seedlings
One of the keys to successful transplanting is not to check the seedlings unnecessarily.
By “checking”, we mean repeatedly moving, lifting, touching or disturbing a newly transplanted seedling to see whether it has established.
Once you have transplanted the seedling correctly, firmed it gently and watered it, leave it alone to establish.
The less disturbance to the young root system, the better.
A successful transplant should involve the minimum possible interruption:
Lift – transplant – firm – water – leave alone.
Avoid Shocking Seedlings with Cold Water
Temperature is another small detail that can make a difference, especially with young seedlings growing indoors or in a greenhouse.
If you are using tap water, fill your watering can and leave it standing for a couple of hours in the greenhouse or indoors before watering.
This allows very cold mains water to warm towards the surrounding temperature.
Young seedlings can be sensitive to sudden changes, so avoiding very cold water helps reduce unnecessary shock.
You don’t need warm water – simply water that has had time to lose its initial chill.
The Golden Rules of Pricking Out
Successful pricking out comes down to a few simple principles:
- Wait until seedlings are large enough to handle safely.
- Always handle seedlings by their seed leaves, never their stems.
- Water the seed tray beforehand and allow excess water to drain.
- Use a dibber, pencil or cane to lift seedlings from underneath.
- Keep as much of the root system intact as possible.
- Plant at approximately the same depth as before.
- Lightly firm the compost around the roots.
- Water well using water that is not excessively cold.
- Don’t panic if seedlings temporarily lean over after watering.
- Once transplanted, disturb them as little as possible.
The most important principle is to be gentle. A seedling with an undamaged stem, a good root system and minimal transplant shock has the best possible chance of quickly establishing and growing into a strong, healthy plants