Building a small retaining wall for a garden
When developing a garden there is often a need to add some retaining walls either because the garden is on a slope or you are creating some change in levels to develop interest in the garden. A retaining wall can either be built using brick or block work.
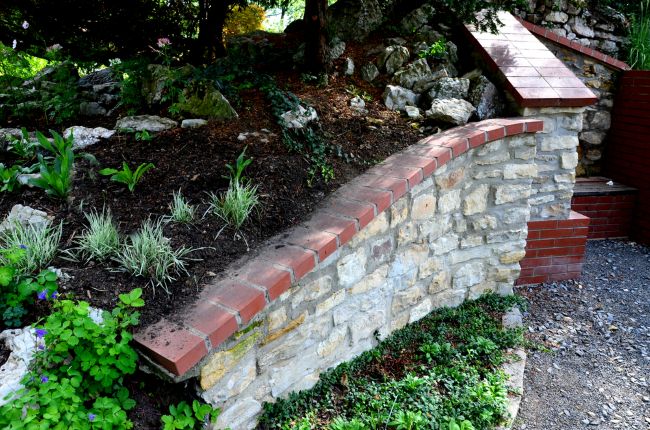
A small retaining wall recently build by the GardenAdvice team
Stage One
Planning is the key to any garden construction as almost all garden construction involves moving around a least a few tons of materials. For example in building a garden wall you will be digging out foundations and on average every one cubic metre of soil or sub soil removed will weight about 1.25 tones the concrete you replace it with will weigh a similar amount, so time spent planning to cut down the excess movement of materials is never wasted. Most builder merchant together with the GardenAdvice time are happy to offer some free advice on working out the quantities and practical methods needed to achieve your gardening projects.
As you plan your garden’s layout with retaining walls to manage slopes or create levels, consider complementing these walls with durable and stylish fencing options like Colorbond Fencing. Colorbond fences not only provide privacy and security but also enhance the overall aesthetic appeal of your garden by seamlessly blending with the surrounding landscape.
Stage Two
mark out the wall as you see it on the ground with some builders sand this will help you to imaging how the final all will look. Then then you are happy with the shape you can start to dig out the foundations. Firstly remove the top soil place to one side in a heap. if the soil is to be left in a heap for 8 weeks or over you should not make the heap over 60cm high as this can kill the soils natural bacteria in the middle of the heap causing it to revert to top soil.
Stage Three
Once you have dug out the basic shape you next need to establish the levels for the base of the foundation. This is done by cutting a number of wooden pegs to the same length approximately 20 to 30cm and hammering them into the base. Next using one as a key peg with a straight edge (normally a long straight piece of wood) and a spirt level you can set the other pegs to the same level at the top. Next in one area dig out the correct depth of the foundation and measure down from the top of peg, this tells you how much you need to dig out to for around each peg area to form the basic foundation depth. If you have a long wall to build it is easier to hire a small Cowley level from your local hire centre.
Stage Four
once you are happy with the foundation trench and the basic levels you can set up a series of wooden pegs in the bottom of each trench to the height you wish to lay the foundations and level each one with a straight edge and spirit level. then using a concrete mixture 6 to 1 ( 6 parts sand 1 part cement ) pour the foundations and level using the pegs in the base of the trench as shown in the photo. the idea is that you end up with a foundation that is level and even. the size and depth of the foundation will depend on the wall and the type of soil you have. the gardenadvice.co.uk free advisor service will be happy to advise. For further details click here mixing small quantities of concrete can be achieved in a wheel barrow by first mixing the ballast and cement then slowly adding the water. However it is often best to hirer a cement mixer from your local hire centre so that you can lay the foundations in one operation as this will be stronger than laying the foundation in several sections.
Stage Five
once the foundation is dry you can lay the first layer of blocks or bricks as a general rule we use a rear skin of concrete blocks for a retaining wall faced with natural stone, mock stone brick or wood cladding. In the photo you will see that we have laided temapary the first course of blocks on there side this is because we often find it easier to do this and it provides additional stability at the base of the wall. to check the final height of the wall and the levels we placed 3 a temparey blocks and placed the straight edge across them using a small spirit level.
Stage six
Laying the blocks or bricks in your wall should be done using mortar, see the GardenAdvice mortar mixing guild. First lay a strip of mortar as shown in the photo then place the first block or brick using light taps from a lump hammer to find the level and position. next butter the second block on the end with the mortar and place it next to the first removing the excess mortar as you go. Normally you lay both ends and spent time making sure there are true and level, then using a builders line strung between the two you can lay the remaining blocks or bricks using the line being careful not to distort it by touching it.
Stage Seven
The next picture shows our first stage wall because the wall is small and on a curve we found the level on each block using a wooden straight edge and spirit level which helped to find the correct level as we laid the blocks around the curve. The straight edge can be seem in the rear of the photo.
If the wall is to retain any amount of soil it should be constructed so that it can allow water to past through to remove some of the weight pressing against it. This is normally achieved by building into the wall a small drainage pipe every metre to allow the water to drain through the wall.


