Creating an alpine garden or bed
Creating an alpine bed or rockery is an ideal project for a small garden, especially if you are new to gardening. It’s a manageable and rewarding project to start with, and if you need any additional help, our MyGardenTeam service is ready to assist.
Most alpine plants thrive in challenging environments, such as alpine mountains and meadows. To ensure your plants flourish, you’ll need to recreate these natural conditions.
Step 1: Create Free-Draining Soil
Firstly and most importantly, you need to establish free-draining soil. This is best achieved by incorporating horticultural grit into the top 50 mm of soil, aiming for a 50/50 soil-to-grit mix. Alpines generally prefer lean soil, so there’s no need to add any base fertilisers at this stage.
Step 2: Prepare the Bed
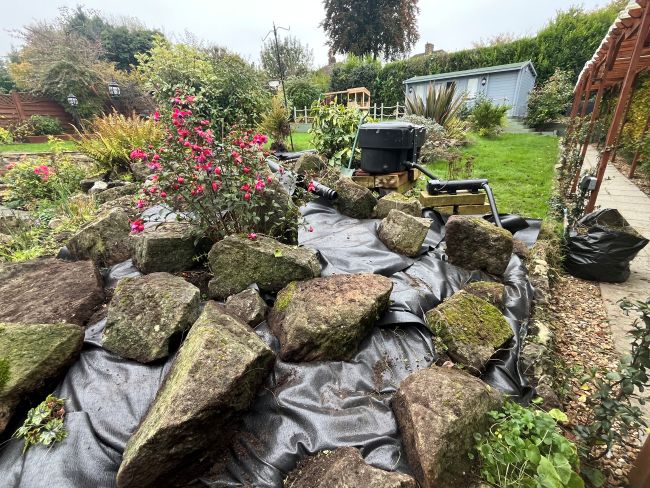
Rocks laid on ground or weed sheeting to reduce the weeding needed. The sheeting will be covered with gravel
As with most gardening projects, preparation is key. Spending time on soil preparation will save you a lot of time later, especially when it comes to weeding. Start by digging the area over and removing any perennial weeds with taproots, such as dandelions. Once the area is dug and the grit incorporated, cover the bed with ground sheeting that allows water to penetrate but blocks most weeds. This is particularly useful for alpine beds, as weeding between rocks and stones can become difficult.
Step 3: Cover with Gravel or Grit
Next, cover the ground sheeting with about 50 mm of gravel or horticultural grit. This will conceal the sheeting and help keep the base of plant stems dry.
Step 4: Arrange Rocks and Cobbles
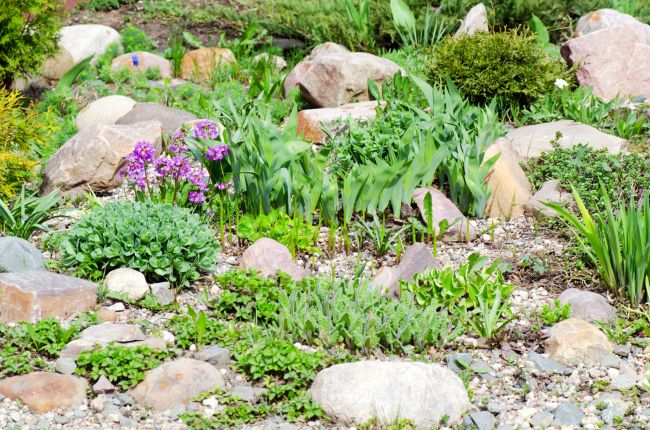
Now you’re ready to arrange the rocks and cobbles. There are no strict rules here; simply place the rocks as you like, then stand back to view the entire bed. Remember, you’ll likely view your garden from the house, so check the view from indoors as well. Once satisfied, you can create additional interest by shaping hollows and rises under and around the rocks to form planting pockets.
Step 5: Planting Your Alpine Bed
With the construction complete, it’s time to start planting. This is best done with a small builder’s trowel. Rake the gravel back from the area you want to plant, then use the trowel to cut a cross in the ground sheeting and turn back the edges. The beauty of alpine beds is that you can continually add plants and bulbs throughout the year as you discover new varieties in garden centres or other gardens.
You can also add pots and troughs to bring extra height and interest to the area.
Step 6: Choose Your Alpine Plants
Alpine plants encompass a wide variety of species, and with some planning, you can create year-round interest in your bed. Alpines are especially suited to creating colourful displays in early spring. If you need help with creating a planting plan, GardenAdvice Advisors are available to help you design one.
For more inspiration, take a look at our top plant picks for an alpine or rockery bed.
Gentiana verna – Known for its striking, deep blue flowers, this low-growing alpine blooms from late spring to early summer, adding vibrant colour to rock gardens and borders.
Saxifraga – A versatile plant that forms a dense, green mat covered with clusters of flowers in various shades of pink, white, red, yellow, and purple, making it ideal for adding colour and texture to rockeries and crevices.
Sempervivum – A hardy succulent often called “houseleeks” or “hens and chicks,” forming small, drought-tolerant rosettes that thrive in full sun. Perfect for rock gardens or containers.
Campanula – Known as “bellflowers,” these plants offer bell-shaped blooms in shades of blue, white, and purple, creating a charming display in summer and fitting well into both borders and rockeries.
Sedum – A resilient, low-maintenance succulent with fleshy leaves and star-shaped flowers that bloom throughout summer. It’s excellent for sunny spots, adding texture and seasonal colour.
Iris reticulata – A dwarf iris species that blooms early, often as one of the first flowers in late winter to early spring, with small, vivid blue to purple flowers that bring a splash of colour to the garden when little else is in bloom.
Daffodil ‘Tete a Tete’ – A miniature daffodil variety producing cheerful yellow flowers in early spring, perfect for pots, rock gardens, and the front of borders.
Cerastium tomentosum (“Snow-in-Summer”) – This groundcover plant has silvery-grey foliage that pairs well with its masses of bright white flowers in early summer, creating a snowy effect.
Pulsatilla vulgaris – Often known as the Pasque flower, it features attractive purple, bell-shaped flowers in spring followed by decorative, silky seed heads. Ideal for sunny borders and rock gardens.
Aubretia – A cascading plant known for its profusion of small flowers in shades of purple, pink, and white, excellent for rockeries, walls, and edging.
Thymus vulgaris – Commonly known as thyme, this aromatic herb has small purple flowers and a spreading growth habit, making it ideal for borders, rock gardens, or as ground cover.
Sparaxis – A hardy bulb known for its vibrant, multicoloured flowers, adding an exotic touch to gardens in late spring to early summer.
Phlox subulata – Also known as “moss phlox,” this dense, carpet-forming perennial produces a mass of colourful flowers in early spring, perfect for ground cover in rockeries or borders.
Armeria maritima – Known as “sea thrift,” it produces compact clusters of pink flowers on slender stems, ideal for rockeries and coastal gardens.
Delosperma cooperi – A low-growing succulent with fleshy leaves and bright magenta blooms in summer, perfect for hot, dry areas and rock gardens.
Erodium reichardii – A low-growing perennial with delicate white to pink flowers, well-suited for rockeries or as a small-scale ground cover.
Arenaria montana – A spreading, carpet-forming plant with pure white flowers in spring, excellent for filling gaps between rocks and paving.
Dianthus alpinus – This alpine pink forms low clumps with fragrant pink or red flowers, bringing both colour and scent to rockeries and borders.
Primula auricula – Compact and well-suited for moist, well-drained soils, especially within rock gardens, auricula primulas add a lovely touch of colour with their clusters of brightly-coloured flowers.
Lithodora diffusa – A sprawling perennial with vibrant, intense blue flowers in summer, great for ground cover in sunny, well-drained spots.


