Growing Shrubs and Garden Plants from Softwood Cuttings
Taking softwood cuttings is one of the easiest and most reliable ways to propagate many shrubs and garden plants. With just a few simple tools and a windowsill or small propagator, you can create several new plants from one healthy parent plant.
Contrary to popular belief, successful propagation is not about having “green fingers”. It is about understanding when to take the cutting and how to prepare it correctly.
What Are Softwood Cuttings?
Softwood cuttings are taken from the young, flexible growth produced during the current season. This growth sits between the very soft tip of the stem and the older woody section near the base.
The newest green growth at the tip often rots before roots develop, while the older woody stem at the base roots more slowly.
The best material for cuttings is the section of stem between these two stages, where the wood is mature enough to survive but still soft enough to root quickly.
How to Identify the Right Stem
The easiest way to judge whether a stem is at the correct stage is the snap test.
- Hold the stem gently between your fingers.
- Bend it slightly.
If the stem:
- Snaps cleanly – it is ready for softwood cuttings
- Bends but does not snap – it is too soft
- Does not bend – it has become too woody
Softwood cuttings are usually taken during the active growing season, often from late spring through summer depending on the plant species.
How to Take a Softwood Cutting
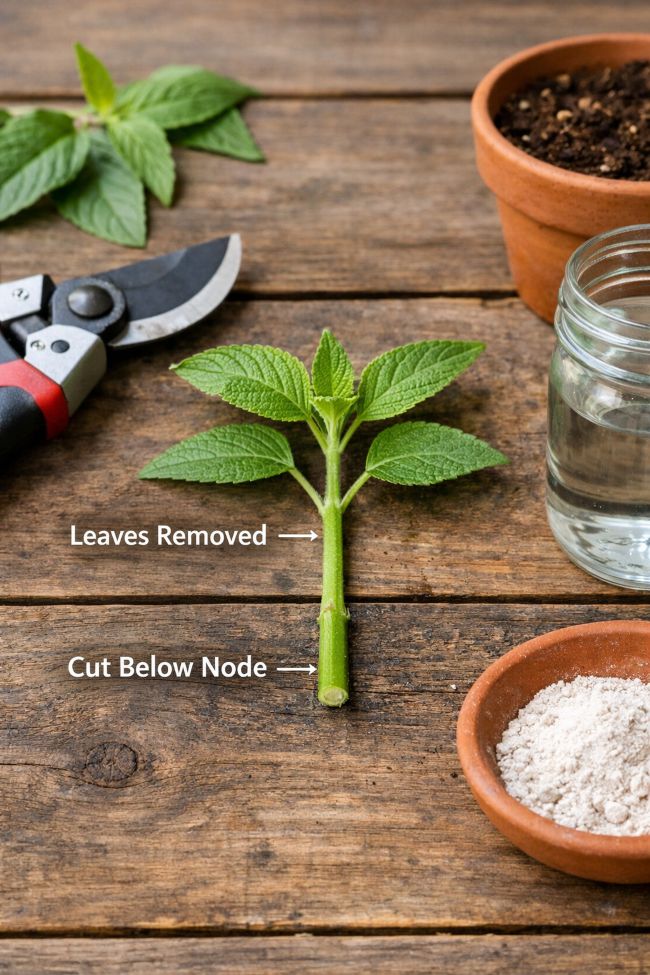
- Choose a healthy stem
Select a strong non-flowering shoot from the current season’s growth. - Cut a section of stem
Take a cutting about 10–15 cm (4–6 inches) long. - Cut just below a leaf node
A node is the point where a leaf joins the stem. - Remove the lower leaves
Remove the leaves from the lower half of the cutting so they do not sit in the compost. - Leave two or three leaves at the top
- Insert into compost
Place the cutting into a pot or tray filled with free-draining compost. - Water and keep humid
Place the cutting somewhere bright but out of direct sun and keep the compost slightly moist.
Most cuttings will begin to root within 2–6 weeks depending on the plant.
Why the Cutting Is Made Below a Node
The cut is made just below a node because this area of the stem contains the plant tissue that is most capable of forming new roots.
Nodes contain higher concentrations of natural growth hormones and active cells that can develop into roots.
The section of stem between nodes (called the internode) is far less likely to produce roots. For this reason, making the cut just below a node greatly improves the success rate when propagating plants from cuttings.
GardenAdvice Recommendation on Rooting Powder
At GardenAdvice, we generally do not recommend using rooting powder.
Many commercial rooting powders use talcum powder as a carrier for the rooting hormone. Talc dust can create unnecessary exposure when handling the powder and has raised health concerns when inhaled repeatedly.
In over twenty years of propagation work during GardenAdvice workshops and garden consultations, we have rarely seen rooting powder significantly improve the success of softwood cuttings.
In most cases, successful propagation depends far more on:
- taking the cutting at the correct stage of growth
- making a clean cut just below a node
- using a well-drained compost
- maintaining humidity while the cutting establishes roots
Healthy plant material and correct technique normally produce excellent results without the need for rooting powders or hormones.
Plants That Grow Well from Softwood Cuttings
Many shrubs and perennial plants can be propagated using this method.
Garden shrubs
- Weigela
- Cornus (Dogwood)
- Buxus (Box)
- Hydrangea
- Buddleja
- Lavatera
- Perovskia
Perennial plants
- Salvia
- Penstemon
- Asters
- Fuchsia
Many other deciduous shrubs and perennials can also be successfully propagated using softwood cuttings.
Compost for Rooting Cuttings
A light, open compost mix works best for rooting cuttings.
GardenAdvice often recommends using:
- John Innes No.1 compost
- mixed with horticultural sand or grit
This mixture provides both nutrients and good drainage, which helps prevent the cutting from rotting while roots develop.
Because these mixes drain well, they may need regular watering during the rooting period.
GardenAdvice Tip
Always take several cuttings at the same time.
Even experienced gardeners expect some failures, but by taking multiple cuttings you greatly increase the chances of producing several healthy new plants.
37 Shrubs That Are Easy to Propagate from Cuttings
Many deciduous garden shrubs, can be propagated by softwood cuttings taken in summer. The ones listed below tend to root quickly and grow into viable shrubs in a short period of time.
- Beautyberry (Callicarpa japonica)
- Beautybush (Kolkwitzia amabilis)
- Blue mist shrub (Caryopteris x clandonensis)
- Burning bush (Euonymus alatus)
- Butterfly bush (Buddleia davidii)
- Chinese stranvaesia (Stranvaesia davidiana)
- Crape myrtle (Lagerstroemia indica)
- Daphne (Daphne caucasica)
- Deciduous azaleas (Rhododendron cvs.)
- Elders (Sambucus spp.)
- Enkianthus (Enkianthus campanulatus)
- Flowering quince (Chaenomeles speciosa)
- Forsythias (Forsythia spp.)
- Honeysuckles (Lonicera spp.)
- Hydrangeas (Hydrangea spp.)
- Japanese maples (Acer palmatum cvs.)
- Kerria (Kerria japonica)
- Large fothergilla (Fothergilla major)
- Lilac (Syringa vulgaris)
- Magnolias (Magnolia spp.)
- Mock orange (Philadelphus coronarius)
- Redtwig dogwood (Cornus alba and sericea)
- Rugosa rose (Rosa rugosa)
- Serviceberries (Amelanchier spp.)
- Slender deutzia (Deutzia gracilis)
- Smoke tree (Cotinus coggygria)
- Spireas (Spiraea spp.)
- Stewartia (Stewartia pseudocamellia)
- Summersweet (Clethra alnifolia)
- Sweetshrub (Calycanthus floridus)
- Viburnums (Viburnum x burkwoodii and carlesii)
- Virginia sweetspire (Itea virginica)
- Weigelas (Weigela spp.)
- Willows (Salix spp.)
- Wintercreeper (Euonymus fortunei)
- Winter hazels (Corylopsis spp.)
- Witch hazels (Hamamelis spp.)


