Garden compost – Four Steps To Making Really Wicked Compost
We here at Garden Advice tell you how to make the best garden compost heap so that it will smell nice and sweet and do wonders for your garden.
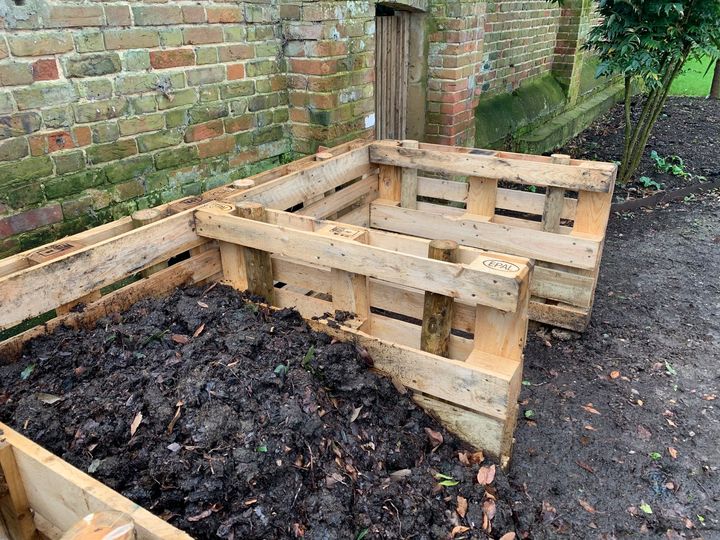
Step One: The Container
Firstly a container is not an absolute necessity as you can make perfectly good compost in a free standing heap as long as it is large enough. You will see later why this may be a drawback. Assuming then that we need to make a container we are faced with many choices. A very adequate container can be constructed by scrounging four shipping pallets and nailing them together to form a cube. If the nails holding the front panel are left protruding enough to get a claw hammer on them they may then be withdrawn in order to gain access to our lovely compost. This route appeals to me as I have a rather parsimonious approach to gardening.
However it must be said that your garden may start looking like Steptoe’s yard [from a comedy series] with a few of these dotted around the place. There are lessons from this approach though. The dimensions are about ideal and the gaps between the boards allow an adequate amount of air to reach the contents. It is also a robust construction which will not collapse with the weight of the compost within. The more DIY [Do It Yourself] orientated among you would be able to construct something much more aesthetically pleasing from rough sawn boards, bearing in mind that sides measuring four to six feet in all directions are more than adequate for our purposes.
You may of course decide to buy a container which is a very good idea if you are one of the mortals whose hammer to thumb aim is as good as mine. Finally the lid. A sound lid which excludes the rain and retains the heat is essential. It may be made from old carpets and plastic sheeting or be a close fitting custom made little number with matching hinges and a sexy little latch, it matters not as long as it performs the above.
Step Two: The Contents
Now the nitty gritty, what goes in it, what can we make into compost. In short anything with an organic origin. Obviously we do not want to put the remains of the Sunday joint in for obvious reasons, every rat within a mile radius will beat a path to your compost for a feed. Simlairly we don’t want to put the remains of next doors cat in there when he has used your petunias for a toilet one time to many, tempting though it may be. The issue here is not really what goes in but how it goes in. Take for instance grass clippings, a fine compost material but every gardener will tell you not on their own. A heap of grass clippings will swiftly become a stinking morass. However mixed with some weeds and shredded woody material such as rose prunings to allow the air to move through it they would be fine, believe me. So what we are looking for is a nice diverse mixture of different types of material. We should mix our heaps like a nice rich fruit cake adding ingredients in just the right proportions to get a good texture. This is best achieved by reserving winter produced woody materials and tough weeds in a separate heap and shredding them before adding them. If you are choking on the thought of buying a shredder don’t, hire one. They don’t cost a fortune to hire and you could club together with a couple of gardening neighbours to defray the cost further, trust me it will be worth it when you see the end result. Another advantage of renting a shredder is the noise, they howl like a banshee and are ideal for wreaking dreadful revenge on that anti-social bugger down the road who likes to play ABBAs greatest hits at two o’clock in the morning when you have an early morning meeting the next day.
All this rambling brings us to the somewhat vexed question of kitchen waste (vegetable of course). It seems that whatever you do your compost always turns out looking lovely except for the banana skins and eggshells peppering it like hideous decorations. The best answer I have to this problem is after much consideration a wormery. I have seen many of these in action and have been impressed by how simple and effective they are.
Step Three: Building And Managing Your Heap
Let us imagine it is spring and a gardeners fancy turns to thoughts of compost. You will soon be faced with grass cuttings and weeds to say nothing of spud [potato] peelings all to be disposed of and transformed into gold by your soon to be compost heap. Don’t panic. you have your nicely shredded heap of woody material to hand, a splendid container and all summer to do your magic. Start by throwing a good layer of woody material into the bottom of the bin to let a bit of air circulate, then mow your lawn and sling in the clippings. If your lawn is large and the clippings numerous you may like to consider adding a little woody material between the third and fourth barrow load. Next perhaps, after a decent interlude and a cold one you fancy a little weeding, carry on, go nuts [crazy], chuck them all in. This material will be fairly diverse in size and texture so should not need the addition of any of our woody material. Then it’s into the house to get the lunch on, this should produce a nice bucket or two(?) of material; heave that in on your way back down the garden to resume your labours. Beware however that the spud peelings etc are not to wet, too much water is very bad for compost heaps so such material should be well drained before it is added to the heap.
If you have kept up this routine throughout the summer your heap should be full by now. Obviously if you have a large garden you may be on your third heap by now, but fear not the principles are the same for postage stamp or stately home. The composting process should have begun and the heap should have heated and cooled by now and be ready to turn.
This is hard yakka [work] so choose a cool day. (Digression: here is were we find out why most people have two bins.) Either fork the material from one bin to the other or drag it all out and chuck [throw] it back in mixing it thoroughly as you go. If it looks a little dry, have a watering can handy andgive it a sprinkle from time to time. The need for this will be explained in the next part, so please bear with me. I feel this is also a good place to discuss the merits or otherwise of compost accelerators, I am unequivocally in favour of them. Composting can be problematic enough without tying one hand behind your back before you start; so use them. You can buy many sorts but they all do more or less the same thing which is help to feed the bacteria (more of which later) which actually make the compost (and you thought it was you). Anyhow, add the accelerator at this stage.
Now when all the material is back in its home in the bin, nicely moistened and fed and the lid nailed down, you can relax and enjoy life. However it is a good idea to monitor the temperature of the bin from time to time just to make sure everything is tickety boo [fine]. This is not as complicated as it sounds. If your (or anybody else’s) cat sleeps on the lid in the middle of winter you can be fairly certain things are as they should be. Seriously, though all you need to do is poke a cane down into the middle of the heap leave it for five minutes and pull it out. If it feels nice and warm to the touch you have cracked it [done it right] and the job’s a good ‘un. Obviously, the temperature of the heap will fall as the bacteria become less active but there should be noticeable warmth there for a least two months from turning. Beware though, gentle reader, if your cane test comes up cold after only a couple of weeks you have a problem and should consider re-turning the heap and adding a little more accelerator or more water.
Step Four: The Science Bit
It would only be fair to ask at this stage how the blazes does a bit of water, air and compost accelerator turn a mass of unprepossessing garden waste into a useful, nee indispensable, garden product. The answer is simple and yet at the same time fiendishly complicated. I will attempt the former explanation. Simply put, it is bacterial activity which does the magic. If you give the little devils the correct living conditions then they will work their magic. A word of caution here though, there are basically two kinds of bacteria, aerobic and anaerobic. this merely means some need air (the aerobic ones) to thrive and others (anaerobic) can manage quite well with little or none. For reasons which will become obvious, the ones we want are the aerobic ones. The anaerobic kind live at the bottoms of ponds, sewers and other wet, dinghy places and give off a fearful smell as they do their nefarious work. If your compost is too cold and wet, this is the kind you will encourage. Beware. Aerobic bacteria on the other hand are creatures of light and air and enjoy a little warmth; correctly made compost heaps are absolutely crawling with the little dears. And how you may ask do we encourage these paragons. By varying the texture of the material we provide for them, in order that air may circulate (and turning the heap to re-invigorate them when the first flush of activity has passed). By providing just enough moisture to allow them to work without drowning them and finally by adding a little something extra to help them to thrive. The life cycle of the compost heap then goes something like this: as you are building theheap and throwing in lots of good green material you will notice it getting very hot, steaming would be good. This is the first phase of activity as the bacteria go to work being fed mostly by the nitrogen in the material. When the heap cools, it is because these bacteria have used up all the available food, air and moisture and are having a little post lunch nap. It is very important to know that at this stage things can go very pear shaped [wrong] as the heap can become anaerobic, but here you come with your fork to turn the pile and restore it to an aerobic condition. This flush of air and the accelerator you have added will wake up our bacteria, and get them working for you again. the second phase of composting will then start, which will not necessarily be as hot and exiting as the first but will still produce plenty of heat. When all finally goes cold, you will be able to break open the heap just in time to feed it to your hungry garden, to start the whole thing going again.
There you go. I hope you enjoyed that little dissertation on the subject of compost and are feeling a little more enlightened. I am sure there are those who will take issue with what I have written. To them I say good luck, bon chance etc. It is only by entering into a debate about things that we make progress.


